
Lesson 11 – Compound Microscope
Introduction
A compound microscope, a binocular or compound light microscope, is a powerful tool used to magnify small objects or specimens not visible to the naked eye. It employs a combination of lenses to achieve high levels of magnification. In this lesson, we will delve into the definition of a compound microscope, learn how to use it, explore its working principle, and examine its various components.
I. Definition
1. What is Compound Microscope?
A compound microscope is a magnification tool that uses a combination of lenses to enlarge the image of a sample or specimen. It is commonly used when higher magnification levels (40x to 1000x) are required. The magnification is achieved through the objective lens (near the sample) and the eyepiece lens (within the eyepiece). The overall magnification of the microscope is determined by multiplying the objective lens’s elaboration by the eyepiece lens’s magnification.
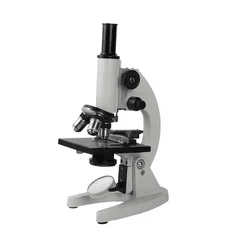
Figure 1: A compound microscope
2. Parts of compound microscope
A compound microscope forms a highly magnified image of the specimen close to the viewer’s vision. The specimen is placed just beyond the objective lens’s focus, producing an inverted and virtual image. The eyepiece lens further magnifies the image, allowing for detailed observation. The working principle involves using lenses to gather, elaborate, and focus light rays to create an enlarged image.
A compound microscope primarily comprises two main systems, namely optical and structural components. Each of these systems contains various individual components, which include:
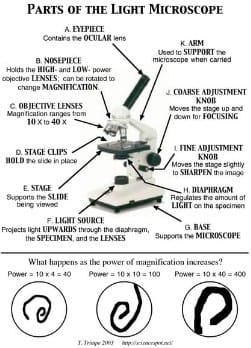
Figure 2: Parts of the light microscope
3. Structural Components
Head:
Upper part of the microscope housing the optical parts.
Arm:
Connects the head with the base, providing stability and portability.
Base:
Foundation of the microscope containing the illuminator for specimen illumination.
4. Optical Components
Eyepiece Tube:
Holds the eyepiece and may include a diopter adjustment ring for personalized vision correction.
Aperture:
A hole on the stage that allows transmitted light from the base to illuminate the slide.
Fine and Coarse Focus Knobs:
Knobs are used for adjusting the microscope’s focus, with the fine focus knob allowing for precise focusing.
Eyepiece:
Located at the top of the microscope, it is where the observer views the specimen. Typically provides 10x magnification and can be interchanged for different magnification levels.
Nosepiece:
Rotating turret that holds and allows for selection of objective lenses of varying magnification.
Stage Clips:
Used to hold the slide with the specimen in place, especially when a mechanical stage is not present.
Objective Lens:
The most crucial optical component, available in various magnification powers (4x to 100x), is responsible for gathering and magnifying the image of the specimen.
Iris Diaphragm:
Controls the light reaching the specimen, located under the stage and above the condenser.
Stage:
Platform where the specimen is placed for observation, with a mechanical stage enabling precise movements.
Condenser:
Focuses and concentrates light from the illuminator onto the specimen, often used in conjunction with the iris diaphragm.
Illuminator:
Light source located in the microscope’s base, typically using halogen bulbs with adjustable lighting settings.
Condenser Focus Knob:
Controls the condenser’s movement to adjust the light’s focus on the specimen.
Rack Stop:
Regulates the movement of the stage to prevent contact between the specimen and the lens, reducing the risk of damage.

Parts of A Compound Microscope.mp4 (Paragraph)
II. How to Use a Compound Microscope?
1. Familiarize Yourself with the Microscope
Place the microscope on a stable and flat surface, ensuring it is secure.
Take a moment to examine and understand the different parts of the microscope, such as the head, arm, base, stage, focus knobs, eyepiece, objective lenses, condenser, and illuminator.
Familiarize yourself with the magnification powers of the objective lenses and the eyepiece.
2. Inspect the Head and Arm
Adjust the angle of the head to a comfortable position for viewing.
Check for any damages or loose parts in the head and arm, ensuring that everything is securely attached and in proper working condition.
Look for any controls or switches related to the illuminator, such as an on/off switch or light intensity adjustment.
3. Examine the Base
Inspect the base of the microscope, ensuring its stability on the surface.
4. Learn about Light Sources
Identify the light source used in your compound microscope. It could be a built-in halogen bulb or an external light source.
If there is an external light source, ensure that it is properly connected and positioned for effective illumination.
If applicable, learn about the different light intensity settings available and adjust them according to your needs.
5. Preparing the Slide and Sample
Place your sample or specimen on a clean glass slide.
If necessary, apply a small amount of a mounting medium to prevent sample movement or deterioration.
Carefully position the slide on the stage and secure it using the stage clips or mechanical stage.
6. Adjusting the Microscope
Start with the lowest magnification objective lens (typically 4x or 10x) in place on the nosepiece.
Use the coarse focus knob to raise the stage to its highest position, ensuring that the objective lens does not touch the slide.
Look through the eyepiece and use the coarse focus knob to slowly lower the stage until the sample comes into view.
Once the sample is in focus, use the fine focus knob to make precise adjustments and sharpen the image.
7. Changing Magnification
Rotate the nosepiece to switch to a higher magnification objective lens.
Use the coarse focus knob to raise the stage slightly, then use the fine focus knob to bring the image into focus.
Repeat this process as you switch between different objective lenses for higher magnification.
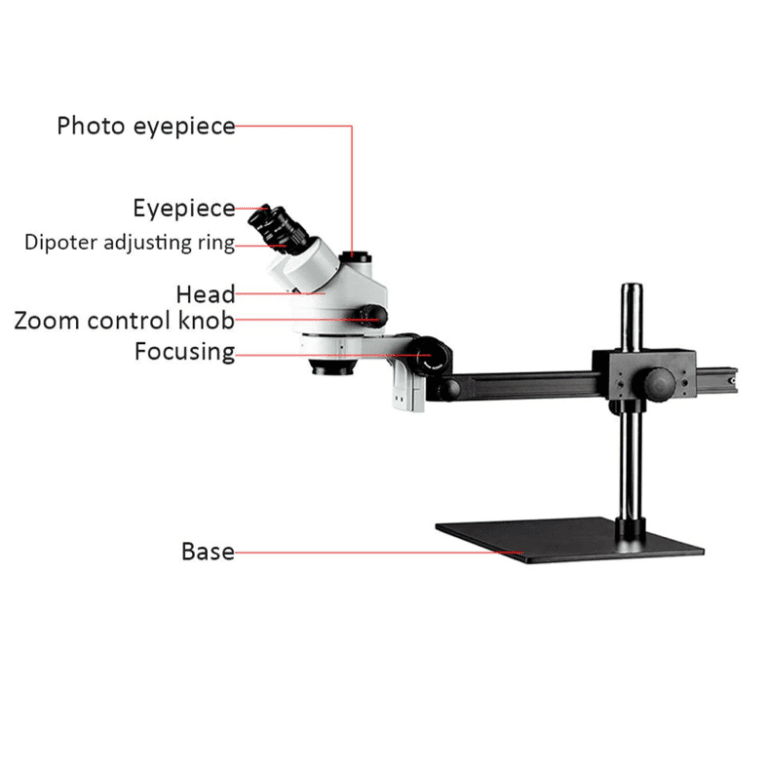
Figure 3: Using the compound microscope
Remember: While using a compound microscope, it’s essential to handle the instrument carefully, avoid touching the lenses, and use proper lighting and focus adjustments for optimal viewing. With practice and patience, you’ll use a compound microscope to enhance your skills in observing and exploring the microscopic world.
III. Frequently asked Questions
1. What is the difference between a compound microscope and a stereo microscope?
The main difference between a compound microscope and a stereo microscope lies in their design and applications. A compound microscope is primarily used for viewing thin, transparent specimens at high magnification, while a stereo microscope provides lower magnification and a three-dimensional view of larger, opaque specimens.
2. Can a compound microscope be used for viewing live specimens?
Yes, a compound microscope can be used to view live specimens. However, it’s important to use appropriate techniques to maintain the viability of the specimen.
3. How do I properly clean and maintain a compound microscope?
Proper cleaning and maintenance are essential for the longevity and optimal performance of a compound microscope. Use a soft, lint-free cloth to wipe the lenses, stage, and body of the microscope. For smudges or stains, slightly dampen the cloth with lens cleaning solution or isopropyl alcohol. Avoid applying excessive pressure or using abrasive materials. Regularly check and clean the condenser, illuminator, and filters. Store the microscope in a clean, dust-free environment, and follow the manufacturer’s instructions for any specific maintenance procedures.
4. Can a compound microscope be connected to a camera or computer for image capture?
Yes, many compound microscopes can be connected to cameras or computers for image capture and documentation.
Conclusion
A compound microscope is a powerful tool that allows us to explore the intricate details of the microscopic world. With its ability to magnify and reveal hidden structures, it has become an essential instrument in scientific research, education, and various industries. By understanding its components, choosing the right magnification, and practicing proper maintenance, we can unlock a wealth of knowledge and gain a deeper understanding of the microscopic realm. So, embrace the power of the compound microscope and embark on a journey of discovery.